springboot2 oauth2 jwt认证服务器和资源服务器
springboot2 oauth2 jwt认证服务器和资源服务器
springboot2 oauth2 jwt认证服务器和资源服务器
概念
1、oauth2各个角色
- resource owner:资源所有者(指用户)
- resource server:资源服务器存放受保护资源,要访问这些资源,需要获得访问令牌
- client:客户端代表请求资源服务器资源的第三方程序,客户端同时也可能是一个资源服务器
- authrization server:授权服务器用于发放访问令牌给客户端
2、四种授权模式
- 授权码模式(授权码模式是功能最完整、流程最严密的授权模式,它的特点是通过客户端的后台服务器,与“服务器提供”的认证服务器进行互动)
- 密码模式 (密码模式中,用户向客户端提供自己的用户名和密码,客户端使用这些信息向“服务提供商”索要授权)
- 客户端模式
- 简化模式
3、以密码模式为例说明
改模式改进后可用于app终端的认证授权,认证过程
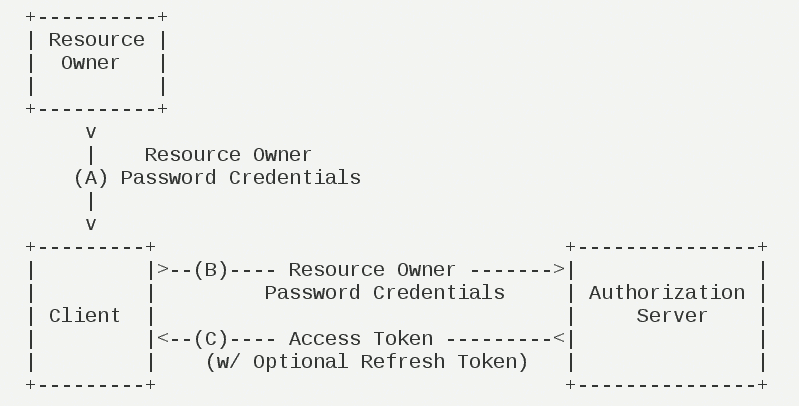
步骤如下
- (A)用户向客户端提供用户名和密码
- (B)客户端将用户名密码发送认证给服务器,向后者请求令牌
- (C)认证服务器确认无误后,向客户端提供访问令牌
B步骤中,客户端发出HTTP请求,包含以下参数:
- grant_type:授权类型,必选,此处固定值“password”
- username:表示用户名,必选
- password:表示用户密码,必选
- scope:权限范围,可选
一、相关依赖
pom.xml中引入相关依赖
<dependency><groupId>org.springframework.boot</groupId><artifactId>spring-boot-starter-web</artifactId></dependency><dependency><groupId>org.springframework.cloud</groupId><artifactId>spring-cloud-starter-oauth2</artifactId></dependency><dependency><groupId>org.springframework.cloud</groupId><artifactId>spring-cloud-starter-security</artifactId></dependency>
二、认证服务器
1、application.properties配置
server.port=8080
server.servlet.context-path=/auth
2、安全相关的配置WebSecurityConfig
以inMemory方式配置简单的认证用户,springboot2要将AuthenticationManager以@Bean方式注入到容器中
@Configuration
public class WebSecurityConfig extends WebSecurityConfigurerAdapter {@Autowiredprivate BCryptPasswordEncoder passwordEncoder;@Autowiredpublic void globalUserDetails(AuthenticationManagerBuilder auth) throws Exception {auth.inMemoryAuthentication().withUser("jk").password(passwordEncoder.encode("jkjk")).roles("USER").and().withUser("admin").password(passwordEncoder.encode("admin123")).roles("ADMIN");}@Override@Beanpublic AuthenticationManager authenticationManagerBean() throws Exception {return super.authenticationManagerBean();}@Overrideprotected void configure(HttpSecurity http) throws Exception {http.authorizeRequests().antMatchers("/login").permitAll().antMatchers("/tokens/**").permitAll().anyRequest().authenticated().and().formLogin().permitAll().and().csrf().disable();}
}
3、认证相关的配置Oauth2AuthorizationServerConfig
注册客户端的id和secret,声明该客户端允许的授权模式,token有效期。
@Configuration
@EnableAuthorizationServer
public class Oauth2AuthorizationServerConfig extends AuthorizationServerConfigurerAdapter{@Autowired@Qualifier("authenticationManagerBean")private AuthenticationManager authenticationManager;@Overridepublic void configure(AuthorizationServerSecurityConfigurer security) throws Exception {security.tokenKeyAccess("permitAll()").checkTokenAccess("isAuthenticated()");}@Overridepublic void configure(ClientDetailsServiceConfigurer clients) throws Exception {clients.inMemory().withClient("admin").secret(passwordEncoder().encode("admin")).authorizedGrantTypes("password", "authorization_code", "refresh_token").scopes("all").accessTokenValiditySeconds(3600).refreshTokenValiditySeconds(2592000).redirectUris("http://localhost:8080");}@Overridepublic void configure(AuthorizationServerEndpointsConfigurer endpoints) throws Exception {endpoints.tokenStore(tokenStore()).allowedTokenEndpointRequestMethods(HttpMethod.GET,HttpMethod.POST).accessTokenConverter(accessTokenConverter()).authenticationManager(authenticationManager);}@Beanpublic TokenStore tokenStore() {return new JwtTokenStore(accessTokenConverter());}@Beanpublic JwtAccessTokenConverter accessTokenConverter() {final JwtAccessTokenConverter converter = new JwtAccessTokenConverter();converter.setSigningKey("123");return converter;}@Beanpublic BCryptPasswordEncoder passwordEncoder() {return new BCryptPasswordEncoder();}
}
三、资源服务器
1、application.properties配置
server.port=8081#resource server 相关配置
security.oauth2.client.client-id=admin
security.oauth2.client.client-secret=admin
security.oauth2.client.user-authorization-uri=http://localhost:8080/auth/oauth/authorize
security.oauth2.client.grant-type=password
security.oauth2.client.scope=all
security.oauth2.client.access-token-uri=http://localhost:8080/auth/oauth/tokensecurity.oauth2.authorization.check-token-access=http://localhost:8080/auth/oauth/check_token#配置check-token的url地址;
security.oauth2.resource.token-info-uri=http://localhost:8080/auth/oauth/check_token
#配置userinfo的url地址
security.oauth2.resource.user-info-uri=http://localhost:8080/auth/me
#如果上面两个都配置了,更倾向于用哪个
security.oauth2.resource.prefer-token-info=true
2、资源服务配置Oauth2ResourceServerConfig
@Configuration
@EnableResourceServer
public class Oauth2ResourceServerConfig extends ResourceServerConfigurerAdapter{@Beanpublic TokenStore tokenStore() {return new JwtTokenStore(jwtAccessTokenConverter());}@Beanpublic JwtAccessTokenConverter jwtAccessTokenConverter() {JwtAccessTokenConverter converter = new JwtAccessTokenConverter();converter.setSigningKey("123");return converter;}
}
3、测试接口TestController
@RestController
public class TestController {@GetMapping("/test")public String test() {return "test api json";}
}
四、测试
分别部署认证服务器和资源服务器
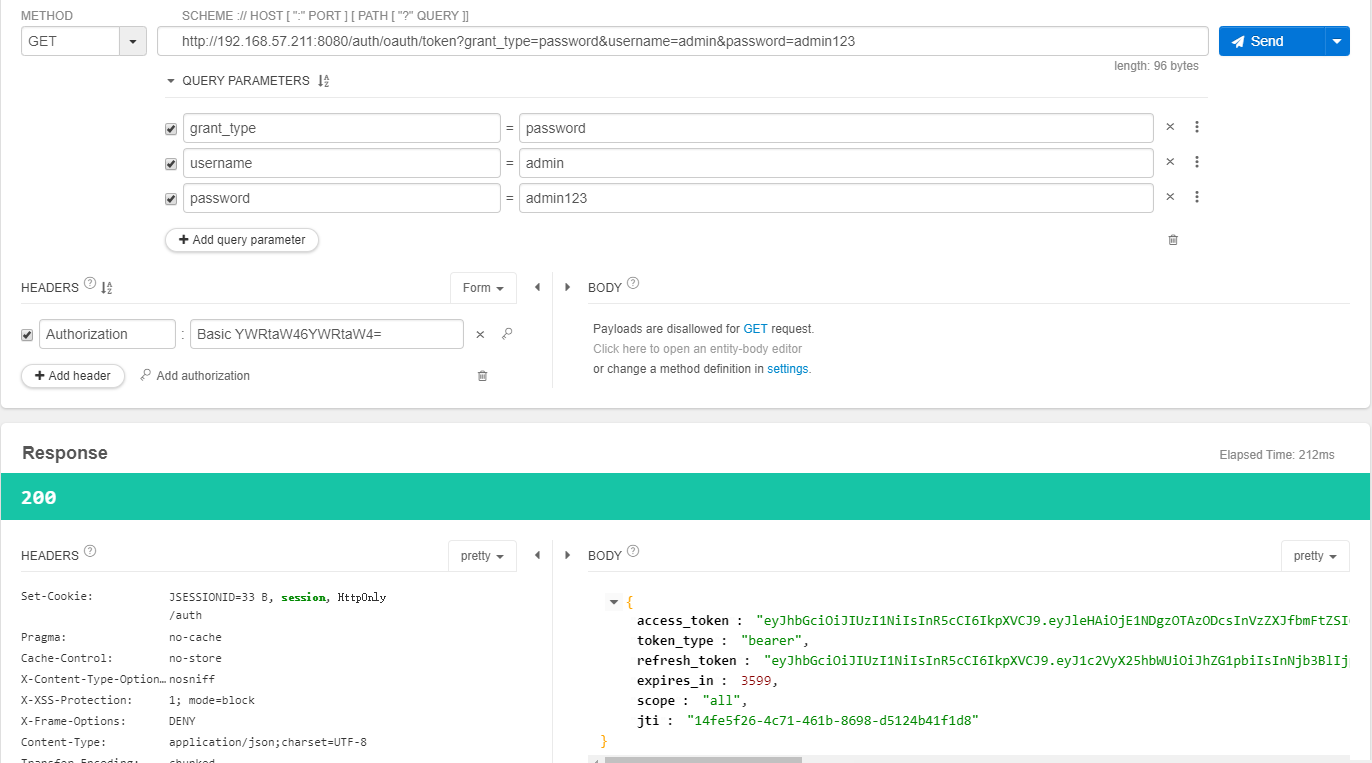
1、向认证服务器申请token
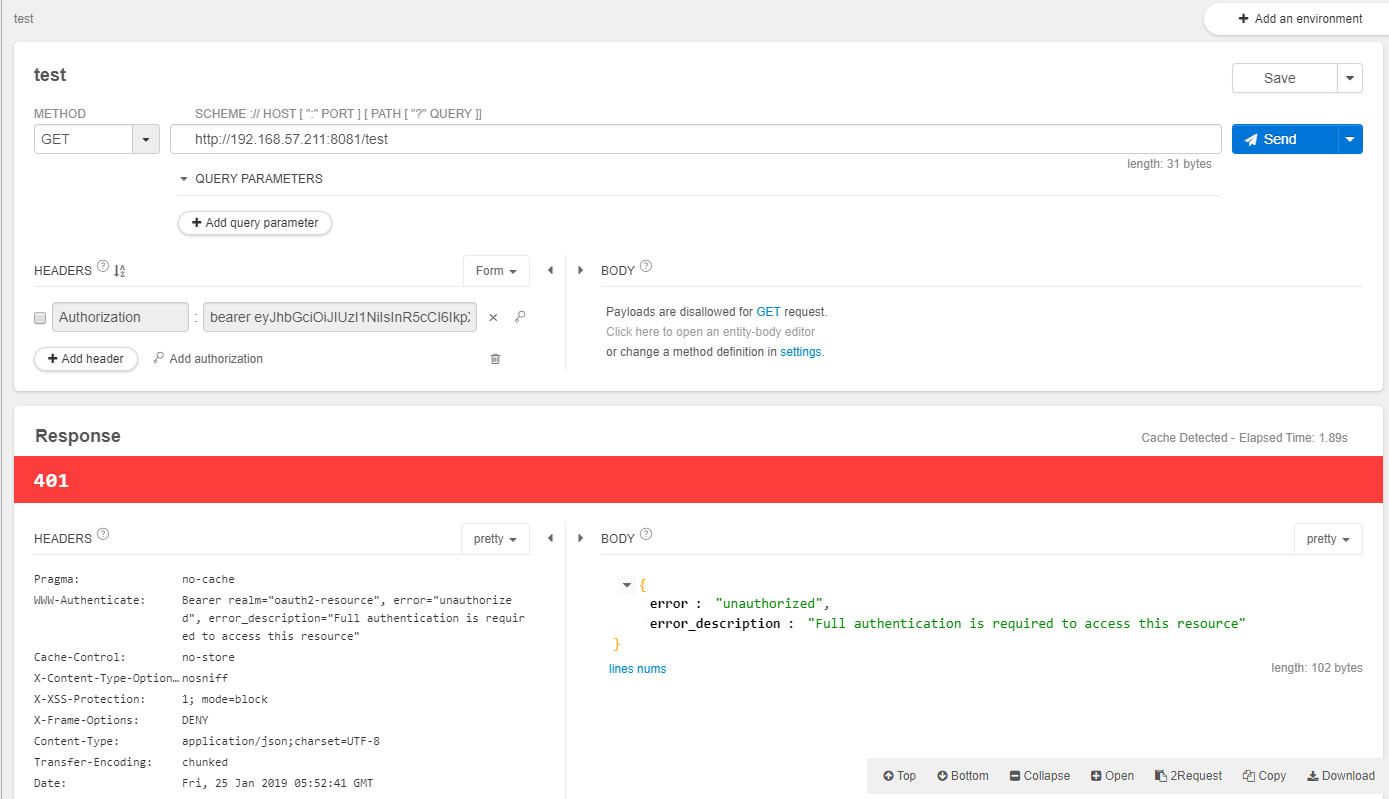
2、没有添加token时请求test接口
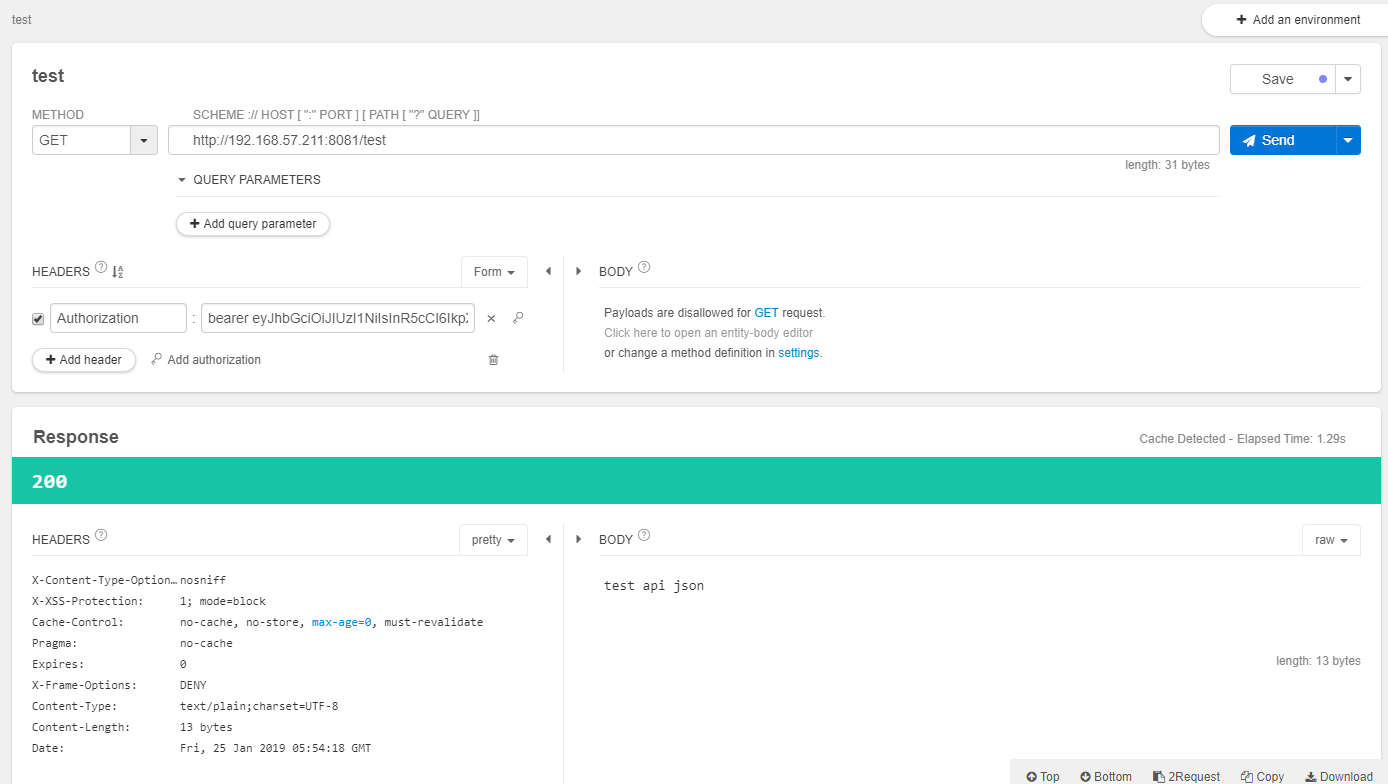
3、带上token请求test接口
参考
https://www.jianshu.com/p/68f22f9a00ee