QT基本操作(简易教程)
QT基本操作(简易教程)
QT 是一个跨平台的C++图形用户界面应用程序框架。
这篇文章能教会你简单的使用QT。
1.初步了解
2.进一步了解
3.信号和槽
4.实现两个窗口的连接
1.初步了解:
创建项目:

(Widgets是部件的意思)Widgets Application 部件应用程序

(文件路径不能存在中文)


基类:
MainWindow 主要用于PC端(windows,带菜单栏)
QWidget 控件的基类
QDialog 对话框
了解一下:
父类 || 子类
基类 || 派生类
会生成一个 class MyWidget : public QWidget (MyWidget继承窗口基类QWidget)
接着下一步,完成

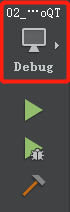
编译运行的方法:
图中的箭头。
快捷键: ctrl+r

.pro为项目文件
#-------------------------------------------------
#
# Project created by QtCreator 2019-06-04T18:33:58
#
#-------------------------------------------------#模块,找模块,头文件按F1
QT       += core gui#为了兼容QT4以前的版本
greaterThan(QT_MAJOR_VERSION, 4): QT += widgets#应用程序的名字
TARGET = day_011
#指定makefile的类型,app,不用管
TEMPLATE = app# The following define makes your compiler emit warnings if you use
# any feature of Qt which has been marked as deprecated (the exact warnings
# depend on your compiler). Please consult the documentation of the
# deprecated API in order to know how to port your code away from it.
DEFINES += QT_DEPRECATED_WARNINGS# You can also make your code fail to compile if you use deprecated APIs.
# In order to do so, uncomment the following line.
# You can also select to disable deprecated APIs only up to a certain version of Qt.
#DEFINES += QT_DISABLE_DEPRECATED_BEFORE=0x060000    # disables all the APIs deprecated before Qt 6.0.0//源文件 .cpp文件
SOURCES += \main.cpp \mywidget.cpp
//头文件 .h文件
HEADERS += \mywidget.h
右键点击.pro文件→在Explorer中显示

自动生成build…
.h头文件
会生成类MyWidget
#ifndef MYWIDGET_H
#define MYWIDGET_H#include <QWidget>class MyWidget : public QWidget //光标对着QWidget,按F1跳到官方对应的文档
{Q_OBJECT //构造的函数,按F4可以看到对应的.cpp是空的//信号与槽的时候需要public:MyWidget(QWidget *parent = 0);~MyWidget();
};#endif // MYWIDGET_H
main.cpp 主函数
#include "mywidget.h"
//QApplication应用程序类
#include <QApplication>int main(int argc, char *argv[])
{//有且只有一个应用程序类的对象QApplication a(argc, argv);//MyWidget继承于QWidget,QWidget是一个窗口基类//所以MyWidget也是一个窗口类//w就是一个窗口MyWidget w;//窗口默认是隐藏的,要显示出来w.show();//等于a.exec();return 0;//作用让程序一直执行,等待用户操作//等待事件发生return a.exec();
}主要框架:
#include <QApplication>int main(int argc, char *argv[])
{QApplication a(argc, argv);//我们写的代码return a.exec();
}
QT头文件的特点:
Qt头文件没有.h
头文件和类名一样
前两个要大写
QT的模块:

2.进一步了解:
创建空项目:

只生成一个项目文件(空的)

添加新文件

名字main.cpp
#include <QApplication>
#include <QWidget> //窗口控件基类
#include <QPushButton>int main(int argc, char *argv[])
{QApplication app(argc, argv);QWidget w;w.setWindowTitle(QString("标题")); //设置标题/*如果不指定父对象,对象和对象(窗口和窗口)没有关系,独立* a指定b为它的父对象,a放在b的上面* 指定父对象,有2种方式:*       1)setParent*       2)通过构造函数传参* 指定父对象,只需要父对象显示,上面的子对象自动显示*/QPushButton b;b.setText("-_-"); //给按键设置内容b.setParent(&w); //指定父对象b.move(100,100); //移动坐标QPushButton b1(&w);b1.setText("abc");w.show();return app.exec();
}
运行结果如图:

这个可以改编译环境。
3.信号和槽
创建一个新的项目:
main.cpp不改变它
#include "mainwidget.h"
#include <QApplication>int main(int argc, char *argv[])
{QApplication a(argc, argv);  //会执行到这句话MainWidget w;  //执行MainWidget的构造函数,所以我们的main.cpp永远不用改w.show();return a.exec();
}
点击工具→选项

用UTF-8
mainWidget.h文件:
#ifndef MAINWIDGET_H
#define MAINWIDGET_H#include <QWidget>
#include <QPushButton>class MainWidget : public QWidget
{Q_OBJECTpublic:MainWidget(QWidget *parent = 0);~MainWidget();private:  //加上了这个QPushButton b1;QPushButton *b2;
};#endif // MAINWIDGET_H
来到mainWidget.cpp
#include "mainwidget.h"
#include <QPushButton>MainWidget::MainWidget(QWidget *parent): QWidget(parent)
{b1.setParent(this); //添加按键b1b1.setText("-_-");b1.move(100,100);b2 = new QPushButton(this); //指针要开内存,添加按键b2b2->setText("---");
}MainWidget::~MainWidget()
{}
下面,我们开始为按钮设置功能:
重点:信号和槽
查看库函数
将光标指向头文件QPushButton,按两下F1

点基类 QAbstractButton


点了有对信号的描述。
按esc退出。
在上面的mainWidget.cpp文件中加上connect(&b1, &QPushButton:: pressed, this, &MainWidget:: close);
即可实现按下关闭窗口。
光标移到close按F1

[slot] 代表槽
来看个例子:
首先,.h文件
#ifndef MAINWIDGET_H
#define MAINWIDGET_H#include <QWidget>
#include <QPushButton>class MainWidget : public QWidget
{Q_OBJECTpublic:MainWidget(QWidget *parent = 0);~MainWidget();void mySlot();//加了个定义函数
private:QPushButton b1;  //定义变量QPushButton *b2;  //定义变量
};#endif // MAINWIDGET_H
main.cpp文件不变
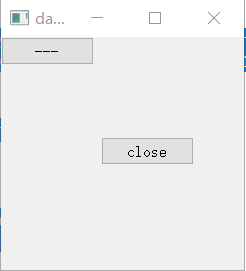
mainWidget.cpp文件
#include "mainwidget.h"
#include <QPushButton>//按F1.再按F1MainWidget::MainWidget(QWidget *parent): QWidget(parent)
{b1.setParent(this);b1.setText("close");b1.move(100,100);b2 = new QPushButton(this);b2->setText("---");connect(&b1, &QPushButton:: pressed, this, &MainWidget:: close);/* &b1:信号发出者,指针类型* &QPushButton:: pressed:处理的信号, &发送者的类名::信号名字* this:信号接收者* &MainWidget:: close: 槽函数,信号处理函数,&接收者类名::槽函数名字*//*自定义槽* Qt5任意的成员函数,普通全局函数,静态函数* 槽函数需要和信号一致(参数,返回值)* 由于信号都是没有返回值,所以,槽函数一定没有返回值*///按下b2时,b2内容变成123connect(b2, &QPushButton::released, this, &MainWidget::mySlot);//松开b2时,b1消失connect(b2, &QPushButton::released, &b1, &QPushButton::hide);/*信号,短信* 槽函数,接受短信的手机*/
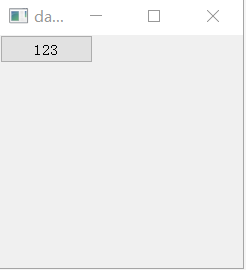
}void MainWidget::mySlot(){ //自定义函数b2->setText("123");
}MainWidget::~MainWidget()
{}
结果:
按一下:
4.实现两个窗口的连接
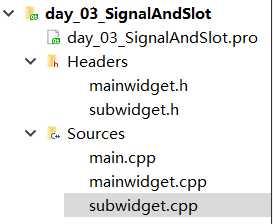
新建窗口:选中项目文件夹,右击,添加新文件,c++,c++ Class,

文件夹就变成这样
这里有时候会爆出mainwidget.obj? error: LNK2019: 无法解析的外部符号 "public: __cdecl SubWidget::SubWidget(class QWidget *)…这样的错误,这时候就要将build文件删除,重新编译。
mainwidget.h
#ifndef MAINWIDGET_H
#define MAINWIDGET_H#include <QWidget>
#include <QPushButton>
#include "subwidget.h"//子窗口头文件class MainWidget : public QWidget
{Q_OBJECTpublic:MainWidget(QWidget *parent = 0);~MainWidget();//void mySlot();void changeWin();void dealsub();void dealSlot(int,QString);
private:QPushButton b3;SubWidget subwin;//对象
};#endif // MAINWIDGET_H
subwidget.h
#ifndef SUBWIDGET_H
#define SUBWIDGET_H#include <QWidget>
#include <QPushButton>class SubWidget : public QWidget
{Q_OBJECT
public:explicit SubWidget(QWidget *parent = nullptr);void sendSlot();
signals:/*信号必须有signals关键字来声明* 信号没有返回值,但可以有参数* 信号就是函数的声明,只需声明,无需定义*/void mySignal();void mySignal(int ,QString);public slots:private:QPushButton b;
};#endif // SUBWIDGET_H
mainwidget.cpp
#include "mainwidget.h"
#include <QPushButton>//按F1.再按F1
#include <QDebug>  //打印MainWidget::MainWidget(QWidget *parent): QWidget(parent)
{setWindowTitle("boss");//等于this->setWindowTitle("boss");b3.setParent(this);b3.setText("切换到子窗口");b3.move(50,50);//显示子窗口//w.show();connect(&b3, &QPushButton::released, this, &MainWidget::changeWin);//处理子窗口的信号void(SubWidget::*funSignal)()=&SubWidget::mySignal;  //函数指针connect(&subwin,funSignal, this, &MainWidget::dealsub);void(SubWidget::*testSignal)(int, QString)=&SubWidget::mySignal; //函数指针connect(&subwin,testSignal, this, &MainWidget::dealSlot);//让窗口大小不变resize(400, 300);
}void MainWidget::dealSlot(int a,QString str){//str.toUtf8 -> 字节数组 QByteArray// ...data() -> QByteArray()qDebug() << a << str.toUtf8().Data();
}void MainWidget::changeWin(){//子窗口显示subwin.show();//本窗口隐藏this->hide();
}void MainWidget::dealsub(){//子窗口显示subwin.hide();//本窗口隐藏this->show();
}MainWidget::~MainWidget()
{}
subwidget.cpp
#include "subwidget.h"SubWidget::SubWidget(QWidget *parent) : QWidget(parent)
{this->setWindowTitle("小弟");b.setParent(this);b.setText("切换到主窗口");b.move(50,50);connect(&b, &QPushButton::clicked, this, &SubWidget::sendSlot);//让窗口大小不变resize(400, 300);
}void SubWidget::sendSlot(){emit mySignal();emit mySignal(250,"hello");  //重载的信息
}


主要步骤:
1.创建c++类文件。
2.主窗口切换到子窗口
1)在主窗口.h中声明一个按键
2)在主窗口.cpp中创建一个按键,按键连接this
3)在主窗口.h中声明一个函数,
4)在主窗口.cpp中自定义函数
3.子窗口切换到主窗口
1)在子窗口.h中声明一个按键
2)在子窗口.cpp中创建一个按键,按键连接this
3)在子窗口.h中声明一个函数,
4)在子窗口.cpp中自定义函数
5)把子窗口的.h 包含进主窗口.h中
6)在主窗口,h建立一个接收信号的函数和一个对象
7)在主窗口.cpp中写一个接收子窗口信号的连接(子窗口连接主窗口)
8)在主窗口.cpp中写一个接收子窗口信号后的函数
(按F4能切换头文件和cpp文件)
函数指针
void fun(int){
}void (*p)(int) = fun;

如果获得了别人的代码,

需要把.user文件删除,(因为里面保存着路径)再编译运行