十二、React脚手架
十二、React脚手架
1. 使用create-react-app创建react应用
1.1. react脚手架
xxx脚手架: 用来帮助程序员快速创建一个基于xxx库的模板项目
包含了所有需要的配置(语法检查、jsx编译、devServer…)
下载好了所有相关的依赖
可以直接运行一个简单效果
react提供了一个用于创建react项目的脚手架库: create-react-app
项目的整体技术架构为: react + webpack + es6 + eslint
使用脚手架开发的项目的特点: 模块化, 组件化, 工程化
1.2. 创建项目并启动
第一步,全局安装:npm install -g create-react-app
第二步,切换到想创项目的目录,使用命令:create-react-app hello-react
第三步,进入项目文件夹:cd hello-react
第四步,启动项目:npm start
npm run eject 命令的意思就是,react脚手架默认把webpack的文件都给隐藏了,例如webpack.config.js,用这个命令可以让这些配置文件显示出来。
1.2.1 package.json里面的短命令:
"scripts": {
"start": "react-scripts start",
"build": "react-scripts build",
"test": "react-scripts test",
"eject": "react-scripts eject"
},
1.2.2 电脑打开文件夹,然后再地址栏输入cmd然后回车就自动打开这个命令的cmd命令行窗口
1.3. react脚手架项目结构
public ---- 静态资源文件夹favicon.icon ------ 网站页签图标index.html -------- 主页面logo192.png ------- logo图logo512.png ------- logo图manifest.json ----- 应用加壳的配置文件robots.txt -------- 爬虫协议文件
src ---- 源码文件夹App.css -------- App组件的样式App.js --------- App组件App.test.js ---- 用于给App做测试index.css ------ 样式index.js ------- 入口文件logo.svg ------- logo图reportWebVitals.js--- 页面性能分析文件(需要web-vitals库的支持)setupTests.js---- 组件单元测试的文件(需要jest-dom库的支持)
index.html
<!DOCTYPE html>
<html lang="en"><head><meta charset="utf-8" /><!-- %PUBLIC_URL%代表public文件夹的路径 --><link rel="icon" href="%PUBLIC_URL%/favicon.ico" /><!-- 开启理想视口,用于做移动端网页的适配 --><meta name="viewport" content="width=device-width, initial-scale=1" /><!-- 用于配置浏览器页签+地址栏的颜色(仅支持安卓手机浏览器) --><meta name="theme-color" content="red" /><meta name="description" content="Web site created using create-react-app" /><!-- 用于指定网页添加到手机主屏幕后的图标 --><link rel="apple-touch-icon" href="%PUBLIC_URL%/logo192.png" /><!--manifest.json provides metadata used when your web app is installed on auser's mobile device or desktop. See https://developers.google.com/web/fundamentals/web-app-manifest/--><!-- 应用加壳时的配置文件 --><link rel="manifest" href="%PUBLIC_URL%/manifest.json" /><!--Notice the use of %PUBLIC_URL% in the tags above.It will be replaced with the URL of the `public` folder during the build.Only files inside the `public` folder can be referenced from the HTML.Unlike "/favicon.ico" or "favicon.ico", "%PUBLIC_URL%/favicon.ico" willwork correctly both with client-side routing and a non-root public URL.Learn how to configure a non-root public URL by running `npm run build`.--><title>React App</title>
</head><body><!-- 若浏览器不支持js则展示标签中的内容 --><noscript>You need to enable JavaScript to run this app.</noscript><div id="root"></div><!--This HTML file is a template.If you open it directly in the browser, you will see an empty page.You can add webfonts, meta tags, or analytics to this file.The build step will place the bundled scripts into the <body> tag.To begin the development, run `npm start` or `yarn start`.To create a production bundle, use `npm run build` or `yarn build`.-->
</body></html>
index.js
import React from 'react';
import ReactDOM from 'react-dom';
import './index.css';
import App from './App';
import reportWebVitals from './reportWebVitals';//StrictMode用来检查APP以及APP子组件是否合理,代码是否合理,例如使用了字符串的ref
ReactDOM.render(<React.StrictMode><App /></React.StrictMode>,document.getElementById('root')
);// If you want to start measuring performance in your app, pass a function
// to log results (for example: reportWebVitals(console.log))
// or send to an analytics endpoint. Learn more: https://bit.ly/CRA-vitals
reportWebVitals();
App.js
import logo from './logo.svg';
import './App.css';function App() {return (<div className="App"><header className="App-header"><img src={logo} className="App-logo" alt="logo" /><p>Edit <code>src/App.js</code> and save to reload.</p><aclassName="App-link"href="https://reactjs.org"target="_blank"rel="noopener noreferrer">Learn React</a></header></div>);
}export default App;
1.4. 功能界面的组件化编码流程(通用)
- 拆分组件: 拆分界面,抽取组件
- 实现静态组件: 使用组件实现静态页面效果
- 实现动态组件
3.1 动态显示初始化数据
3.1.1 数据类型
3.1.2 数据名称
3.1.3 保存在哪个组件
3.2 交互(从绑定事件监听开始)
2. 脚手架版 Hello React
2.1 注意事项
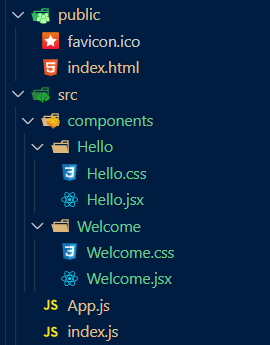
为了区分组件和普通js文件,可以把定义组件的js文件后缀改成jsx
一个组件一个文件夹
引入js文件或者jsx文件时,可以不写后缀名
组件文件夹中的文件可以都命名为index,例如index.jsx/index.css,引入的时候可以直接引到目录名就行了
2.2 文件目录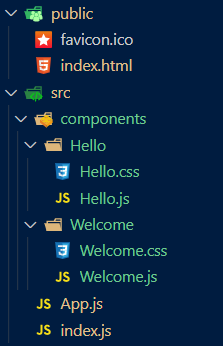
2.3 代码
index.html
<!DOCTYPE html>
<html lang="en"><head><meta charset="utf-8" /><link rel="icon" href="%PUBLIC_URL%/favicon.ico" /><title>React App</title></head><body><div id="root"></div></body>
</html>
index.js
import React from "react";
import ReactDOM from "react-dom";
import App from "./App";ReactDOM.render(<React.StrictMode><App /></React.StrictMode>,document.getElementById("root")
);
App.js
import React, { Component } from "react";
import Hello from "./components/Hello/Hello";
import Welcome from "./components/Welcome/Welcome";
export default class App extends Component {render() {return (<div><Hello></Hello><Welcome></Welcome></div>);}
}
Hello.jsx
import React, { Component } from "react";
import "./Hello.css";
export default class Hello extends Component {render() {return (<div><h1 className="title">Hello React</h1></div>);}
}
Hello.css
.title {background-color: pink;
}
Welcome.jsx
import React, { Component } from "react";
import "./Welcome.css";export default class Welcome extends Component {render() {return <h2 className="demo">Welcome</h2>;}
}
Welcome.css
.demo {background-color: skyblue;
}
注意:组件名字改为index.jsx,然后在其他地方引入这个组件的时候可以只到路径就可以了,例如:import Hello from './components/HelloWorld';
引入时候可以省略index.jsx这个名字

3. VSCode生成代码模板

rcc+回车 (react class component)
rfc(react function component)

import React, { Component } from 'react'export default class Demo extends Component {render() {return (<div></div>)}
}

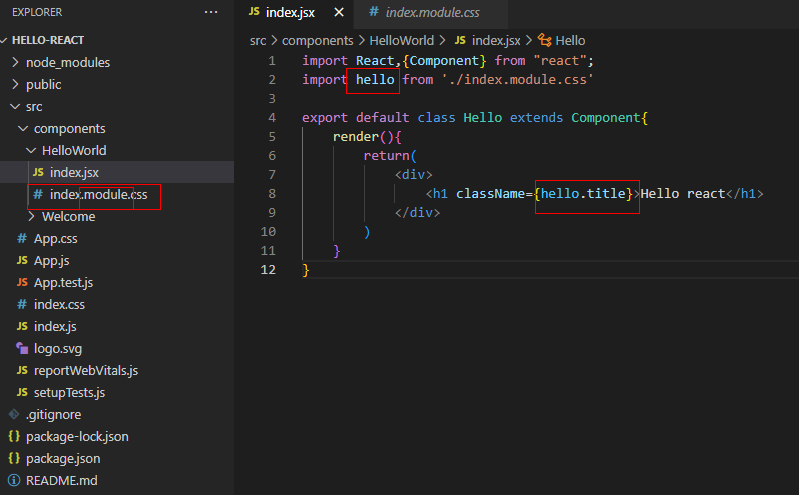
4. 样式的模块化
不同的组件的样式文件中定义相同的样式,例如:都定义了.title {color:red},那么有的组件的样式就会被覆盖掉。所以用样式的模块化:
文件名保存为 index.module.css
引入文件 import hello from './index.module.css'
使用样式 <h2 className={hello.title}> Hello </h2>